As temperatures drop and winter approaches, outdoor and feral cats face serious challenges staying warm and safe. While these resilient animals have survived outdoors for generations, a simple winterized shelter can make the difference between survival and suffering during harsh weather conditions.Building a winter cat shelter is easier and more affordable than you might think. With just a few materials and an hour or two of your time, you can create a life-saving refuge for community cats in your neighborhood.
Why Winter Shelters Matter
 Outdoor cats are resourceful, but extreme cold, wind, rain, and snow can be deadly. Hypothermia and frostbite are real threats, especially for young, elderly, or sick cats. A proper winter shelter provides:
- Protection from wind, rain, and snow
- Insulation to retain body heat
- A dry, safe place to rest
- Reduced stress on cats’ bodies during cold weather
Even if you don’t manage a cat colony, providing shelters helps any outdoor cats in your area, including lost pets trying to survive until they’re reunited with their families.
Materials List
Basic Shelter Option (Styrofoam Cooler Method)
- 1 large styrofoam cooler with lid (at least 18″ x 24″)
- Straw (NOT hay – straw is hollow and insulates better)
- Utility knife or box cutter
- Duct tape or waterproof tape
- Waterproof tarp or plastic sheeting (optional, for extra protection)
Sturdier Shelter Option (Plastic Storage Bin Method)
- 1 large plastic storage bin with lid (18-gallon or larger recommended)
- 1 smaller plastic storage bin with lid (optional, for double-wall insulation)
- Styrofoam sheets or panels (1-2 inches thick)
- Straw bedding
- Utility knife or box cutter
- Duct tape or waterproof tape
- Small piece of flexible plastic or rubber for door flap (optional)
Additional Supplies (For Both Methods)
- Bricks or cinder blocks (to elevate shelter off ground)
- Heavy rocks or stakes (to secure shelter)
- Mylar emergency blankets (optional, for extra insulation on interior walls)
Step-by-Step Instructions
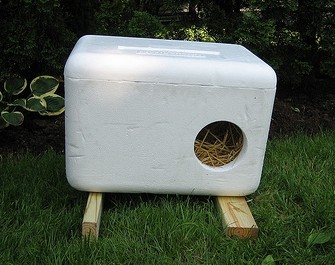 Method 1: Styrofoam Cooler Shelter
Step 1: Create the Entrance Cut a 6-inch diameter doorway on one of the short sides of the cooler, about 3 inches from the bottom. This keeps cold air from settling inside while allowing easy access.
Step 2: Insulate if Needed Most styrofoam coolers are already well-insulated, but you can line the interior walls with mylar emergency blankets for extra warmth retention.
Step 3: Add Bedding Fill the bottom of the shelter with 4-6 inches of straw. Straw is essential – it’s water-resistant, provides excellent insulation, and allows cats to burrow for warmth. Never use hay (which absorbs moisture), blankets, or towels (which retain dampness and can cause hypothermia).
Step 4: Secure the Lid Make sure the lid fits tightly and tape it down with duct tape to prevent it from blowing off in wind.
Step 5: Position and Protect Place the shelter on bricks or cinder blocks to keep it off the cold, wet ground. Position the entrance away from prevailing winds. You can place a tarp over the top for extra weather protection, but ensure it doesn’t block the entrance.
Method 2: Plastic Storage Bin Shelter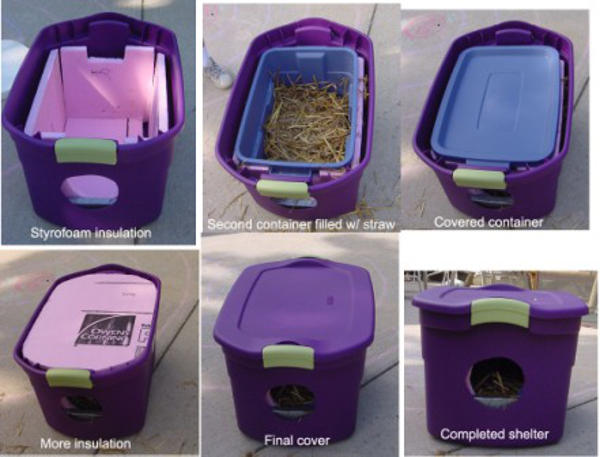
Step 1: Prepare the Bin(s) If using two bins for extra insulation, place the smaller bin inside the larger one, leaving a gap between them.
Step 2: Cut the Entrance Cut a 6-inch diameter entrance hole on one short side, about 3 inches from the bottom. If using double bins, cut holes in both that align perfectly.
Step 3: Insulate the Walls Line the interior walls and floor with styrofoam sheets, cutting them to fit snugly. If using double bins, fill the gap between them with straw or styrofoam pieces. You can also attach mylar blankets to the interior for additional insulation.
Step 4: Create a Door Flap (Optional) Cut a piece of heavy plastic or rubber slightly larger than the entrance hole and attach it at the top of the opening with duct tape. This creates a flexible door that keeps cold air out while allowing cats easy entry.
Step 5: Add Bedding Fill with 4-6 inches of straw bedding.
Step 6: Secure the Lid Drill several small ventilation holes near the top of the bin (away from the entrance side) to prevent condensation buildup. Secure the lid tightly with bungee cords or duct tape.
Step 7: Elevate and Position Place on bricks or blocks, position away from wind, and weigh down with rocks or secure with stakes driven through holes drilled in the back corners.
Placement Tips
Location Matters:
- Place shelters in quiet, secluded areas where cats already frequent
- Position away from high-traffic areas and loud noises
- Face entrance away from prevailing winds
- Provide some overhead cover (under a deck, porch, or thick bushes)
- Ensure the shelter is hidden from view to protect cats from disturbance
Keep It Accessible:
- Don’t place shelters where they might be disturbed by dogs or wildlife
- Ensure cats have multiple escape routes from the area
- Position near food and water sources (but not too close – this attracts other animals)
Multiple Shelters:
- If managing a colony, provide multiple shelters
- Cats prefer individual spaces and may not share
- This also provides backup options if one shelter becomes compromised
Maintenance Throughout Winter
Regular Checks:
- Inspect shelters weekly for damage
- Check that entrances remain clear of snow and debris
- Replace straw if it becomes wet or soiled (usually every 3-4 weeks)
- Repair any cracks or holes immediately
Weather Monitoring:
- After storms, check that shelters haven’t been displaced or damaged
- Clear snow away from entrances
- Ensure ventilation holes haven’t become blocked
Signs of Use:
- Look for paw prints in snow leading to shelter
- Check if straw has been disturbed or formed into a nest
- You may see cats using shelters at dawn or dusk
Additional Winter Care Tips
While shelters are crucial, remember these other winter care essentials:
Food and Water:
- Increase food portions in winter – cats need more calories to stay warm
- Provide fresh, unfrozen water twice daily
- Use heated water bowls if electricity is available
- Feed cats on a consistent schedule so they’re not out in extreme cold for long periods
Health Monitoring:
- Watch for signs of frostbite (pale or gray ears, tail tip, or paw pads)
- Monitor for limping or unusual behavior
- Contact a rescue if a cat appears injured or extremely ill
Community Involvement:
- Let neighbors know about your winter cat shelters
- Encourage others to build shelters too
- Share information about TNR (Trap-Neuter-Return) programs
- Report aggressive behavior toward community cats to authorities
Cost-Effective Options
Building winter shelters doesn’t have to be expensive:
- Free or cheap materials: Check local buy-nothing groups, Craigslist free section, or behind stores for styrofoam coolers and plastic bins
- Bulk straw: Purchase from farm supply stores (much cheaper than pet stores)
- Repurpose materials: Old coolers, storage bins, or even wooden boxes can be converted
- Community builds: Organize shelter-building events where materials costs are shared
The Impact of Your Efforts
Every shelter you build makes a tangible difference. Outdoor cats face mortality rates that spike dramatically during extreme weather. Your simple shelter could:
- Save a cat’s life during a dangerous cold snap
- Provide refuge for a lost pet trying to survive until rescue
- Support TNR colony management by giving cats safe recovery spaces
- Reduce suffering and improve quality of life for community cats
Getting Started Today
Don’t wait for the first freeze to start building. Cats need time to discover and feel comfortable with new shelters, so set them up in early fall if possible.
Remember: you don’t have to be a master carpenter or have a big budget to make a difference. A basic styrofoam cooler shelter built in 30 minutes can save a life.
Connect With AdvoCats Rescue
Need help locating community cats in your area? Want to learn more about TNR? Looking for guidance on managing a colony? AdvoCats Cat Rescue is here to support your efforts to help community cats.
Together, we can ensure every cat in our community has a chance to survive and thrive, even in the harshest winter weather.
Have you built a winter cat shelter? Share your photos and tips with us! Tag @AdvocatsCatRescue on social media or visit our website at advocatslife.org